PT. Hawk Teknologi Solusi

Silahkan Cari Disini

Selasa, 28 Oktober 2008

IPv6 di Router Cisco

Contoh Sederhana Configure IPv6 di Cisco..

http://oprekan.wordpress.com/2007/09/26/contoh-sederhana-configure-ipv6-di-cisco/

Kemampuan Router Cisco untuk bisa mendukung operasional IPv6 salah satunya versi IOS yang lebih baru dan umumnya sudah stable pada versi IOS 12.2 keatas, serta module supervisor engine (SUP) untuk cisco 6500 & 7600 untuk support ipv6 (Thx to Fjr)

Referensi dari web www.cisco.com untuk IOS yang sudah support IPv6 adalah :
12.0S, 12.xT, 12.2S, 12.2 SB, 12.2SRA, 12.3, dan 12.4

Berikut list Seri Router yang sudah pernah dicoba IPv6 berikut IOS nya

- Router Cisco 7200 (IOS 12.2 T & 12.3)
- Router Cisco 3660 (IOS 12.2 T)
- Router Cisco 3640 (IOS 12.2 T)

Resources memory dan CPU juga perlu dipertimbangkan bila ingin mengembangkan dari Routing dasar ke Advance Routing (IGP & EGP).
Konfigurasi dasar IPv6 di Router Cisco :

1. Contoh Konfigurasi IPv6 Address di Interface Fisik & Sub Interface

gw-ipv6#conf t
gw-ipv6(config)# ipv6 unicast-routing
! untuk mengaktifkan forwarding paket antar interface Router
gw-ipv6(config)# ipv6 cef
! untuk mengaktifkan fitur express forwarding paket IPv6
gw-ipv6(config)#int ethernet 0
gw-ipv6(config-if)#no shutdown
gw-ipv6(config-if)#ipv6 enable
! Untuk mengaktifkan IPv6 di interface
gw-ipv6(config-if)#ipv6 address 2404:177:0253::1/123
gw-ipv6(config-if)#^Z

gw-ipv6#sh run int ethernet 0
! untuk menampilkan konfigurasi khusus Ethernet 0 saja

Building configuration…
!
Current configuration : 189 bytes
!
interface Ethernet3/0
no ip address
ipv6 enable
ipv6 address 2404:177:253::1/123
end

gw-ipv6#wr
! untuk menyimpan konfigurasi di NVRAM

2. Contoh Konfigurasi IPv6 Address di Interface Virtual (Tunnel)

gw-ipv6#conf t
gw-ipv6(config)#int tunnel 100
gw-ipv6(config-if)#ipv6 enable
gw-ipv6(config-if)#ipv6 address 2404:177:A::1/126
gw-ipv6(config-if)#tunnel source ipv4 address/nama interface
! Tunnel Source merupakan ipv4 address disisi router ini / nama interfacenya
gw-ipv6(config-if)#tunnel destin
ation ipv4address
! Tunnel Destination merupakan ipv4 address disisi router lawan yang akan kita bangun tunnel.
! IPv4 tunnel source disisi pertama merupakan IPv4 tunnel destination di router kedua.
! Demikian juga sebaliknya.
gw-ipv6(config-if)#tunnel mode ipv6ip
! ipv6ip merupakan mode tunnel IPv6 langsung (direct).

3. Contoh Konfigurasi Routing Static IPv6

gw-ipv6#conf t
gw-ipv6(config)#ipv6 route 2404:175::/32 tunnel100
! untuk me route paket ke prefix 2404:175::/32 lewat tunnel100
! routing ke nama interface bisa diganti dengan ipv6 address tunnel di seberang

Wassalam,

a. rahman isnaini r. sutan [2404:170:ee02::10]

Pengenalan Internet Protokol versi 6 (IPv6)

Author: pangeran_biru
Online @ www.echo.or.id :: http://ezine.echo.or.id

http://ezine.echo.or.id/ezine7/ez-r07-pangeran_biru-pengenalan%20IPv6.txt


=== Pengenalan Internet Protokol versi 6 (IPv6) [primbon #1] ===


Assalamualaikum wr.wb

Awalnya artikel ini saya tulis tentang implementasi IPv6 pada sistem operasi linux,
tetapi setelah saya tulis kok kepanjangan kalo hanya dijadikan satu primbon oleh
karena itu saya memutuskan menuliskannya kedalam 2 primbon (yaitu pengenalan IPv6 primbon #1,
dan Implementasi IPv6 pada sistem operasi linux primbon #2).


Dalam jaringan komputer dikenal adanya suatu protokol yang mengatur bagaimana
suatu node berkomunikasi dengan node lainnya didalam jaringan, protokol tersebut
berfungsi sebagai bahasa agar satu komputer dapat berkomunikasi satu dengan yang lainnya.
protokol yang merupakan standar de facto dalam jaringan internet yaitu protokol TCP/IP,
sehingga dengan adanya TCP/IP komputer yang dengan berbagai jenis hardware dan berbagai
jenis sistem operasi (linux,Windows X, X BSD, de el el) tetap dapat berkomunikasi.

Internet Protocol (IP) merupakan inti dari protokol TCP/IP, seluruh data yang berasal dari
layer-layer diatasnya harus diolah oleh protokol ini agar sampai ketujuan.versi IP yang saat
ini telah dipakai secara meluas di internet adalah Internet Protocol versi 4 (IPv4).

perkembangan internet yang sangat pesat sekarang ini menyebabkan alokasi alamat (IP addres)
IPv4 semakin berkurang, hal ini menyebabkan harga IP address legal sangat mahal
(kecuali maok!!!heu...heu...).Untuk mengatasi kekurangan alokasi IP address maka IETF
mendesain suatu IP baru yang disebut Internet Protocol versi 6 (IPv6).

pada IPv6, panjang alamat terdiri dari 128 bit sedangkan IPv4 hanya 32 bit. sehingga IPv6
mampu menyediakan alamat sebanyak 2^128 [2 pangkat 128] atau 3X10^38 alamat, sedangkan IPv4
hanya mampu menyediakan alamat sebanyak 2^32 atau 4,5X10^10 alamat.

oke, tadi cuma intro aja! sekarang kita lanjutkan ke yang lebih dalam lagi.
kemon baybeh!!!!!

sekarang saya akan menjelaskan perbedaan yang lainnya antara IPv4 dengan IPv6.

A.Struktur pengalamatan

#IPv4

pengalamatan IPv4 menggunakan 32 bit yang setiap bit dipisahkan dengan notasi titik.
notasi pengalamatan IPv4 adalah sebagai berikut:

XXXXXXXX.XXXXXXXX.XXXXXXXX.XXXXXXXX

dimana setiap simbol X digantikan dengan kombinasi bit 0 dan 1.misalnya:

10000010.11001000.01000000.00000001 (dalam angka biner)

cara penulisan lain agar mudah diinget adalah dengan bentuk 4 desimal yang dipisahkan
dengan titik. misal untuk alamat dengan kombinasi biner seperti diatas dapat dituliskan
sebagai berikut:

130.200.127.254

penulis sudah menganggap teman-teman semua dah bisa cara untuk mengkonversi dari bilangan
biner ke desimal:). cos' kalo harus dijelasakan lagi nanti tambah ruwet nih artikel:p
oke sekarang berlanjut ke struktur pengalamatan IPv6!


#IPv6

Tidak seperti pada IPv4 yang menggunakan notasi alamat sejumlah 32 bit, IPv6 menggunakan
128 bit. dah tau khan kenapa jadi 128 bit? yup biar alokasinya bisa lebih banyak.
oke sekarang kita liat notasi alamat IPv6 adalah sebagai berikut:

X:X:X:X:X:X:X:X

kalo dalam bentuk biner ditulis sebagai berikut:

1111111001111000:0010001101000100:1011111001000001:1011110011011010:
0100000101000101:0000000000000000:0000000000000000:0011101000000000

(dua blok diatas sebenarnya nyambung tapi agar tidak memakan tempat maka ditulis kebawah)
itu notasi alamat IPv6 kalo dalam bentuk biner hal ini sengaja saya tulis bukan untuk membuat
pusing yang baca tetapi untuk menunjukkan betapa panjangnya alamat IPv6.
silahkan bandingkan dengan panjangnya IPv4.

nah! agar lebih mudah diinget setiap simbol X digantikan dengan kombinasi 4 bilangan
heksadesimal dipisahkan dengan simbol titik dua [:]. untuk contoh diatas dapat ditulis sbb:

FE78:2344:BE43:BCDA:4145:0:0:3A

lebih enak diliatnya khan?nah sistem pengalamatan IPv6 dapat disederhanakan jika terdapat
berturut-turut beberapa angka "0". contohnya untuk notasi seperti diatas dapat ditulis:

FE78:2344:BE43:BCDA:4145:0:0:3A -------> FE78:2344:BE43:BCDA:4145::3A

contoh lagi:

8088:0:0:0:0:0:4508:4545 -------->8088::4508:4545


B.Sistem pengalamatan

#IPv4

Sistem pengalamatan IPv4 dibagi menjadi 5 kelas, berdasarkan jumlah host yang dapat dialokasikan
yaitu:

Kelas A : range 1-126
Kelas B : range 128-191
kelas C : range 192-223
kelas D : range 224-247
kelas E : range 248-255

tapi yang lazim dipake hanya kelas A,B dan C sedangkan kelas D dipakai untuk keperluan alamat
multicasting dan kelas E dipake untuk keperluan eksperimental.

selain itu pada IPv4 dikenal istilah subnet mask yaitu angka biner 32 bit yang digunakan untuk
membedakan network ID dan host ID, menunjukkan letak suatu host berada dalam satu jaringan
atau lain jaringan.contohnya kaya gini:

IP address: 164.10.2.1 dan 164.10.4.1 adalah berbeda jaringan jika menggunakan netmask
255.255.254.0, tetapi akan jika netmasknya diganti menjadi 255.255.240.0 maka kedua
IP address diatas adalah berbeda jaringan. paham belom? kalo belom paham gini caranya:


164.10.2.1-------> 10100100.00001010.00000010.00000001
255.255.254.0----> 11111111.11111111.11111110.00000000
____________________________________ XOR
10100100.00001010.00000010.00000000-->164.10.2.0
dan
164.10.4.1-------> 10100100.00001010.00001000.00000001
255.255.254.0----> 11111111.11111111.11111110.00000000
____________________________________ XOR
10100100.00001010.00001000.00000000-->164.10.4.0


operasi XOR caranya seperti pertambahan waktu SD, cuman lebih mudah, gampangnya gini kalo
angka "1" jumlahnya genap hasilnya "1" kalo jumlah "1" ganjil hasilnya "0" (1+1=1, 1+0=0)
(heu...heu...).

terlihat hasil operasi XOR dua IP address dengan netmask yang sama hasilnya beda berarti
kedua IP address tersebut berbeda jaringan. untuk contoh berikutnya yang menggunakan
netmask 255.255.240.0 silahkan coba sendiri.

#IPv6

pada IPv6 tidak dikenal istilah pengkelasan, hanya IPv6 menyediakan 3 jenis pengalamatan
yaitu: Unicast, Anycast dan Multicast. alamat unicast yaitu alamat yang menunjuk pada sebuah
alamat antarmuka atau host, digunakan untuk komunikasi satu lawan satu. pada alamat unicast
dibagi 3 jenis lagi yaitu: alamat link local, alamat site local dan alamat global.
alamat link local adalah alamat yang digunakan di dalam satu link yaitu jaringan local yang
saling tersambung dalam satu level. sedangkan alamat Site local setara dengan alamat privat,
yang dipakai terbatas di dalam satu site sehingga terbatas penggunaannya hanya didalam satu
site sehingga tidak dapat digunakan untuk mengirimkan alamat diluar site ini.
alamat global adalah alamat yang dipakai misalnya untuk Internet Service Provider.

alamat anycast adalah alamat yang menunjukkan beberapa interface (biasanya node yang berbeda).
paket yang dikirimkan ke alamat ini akan dikirimkan ke salahsatu alamat antarmuka yang paling
dekat dengan router. alamat anycast tidak mempunyai alokasi khusus, cos' jika beberapa
node/interface diberikan prefix yang sama maka alamat tersebut sudah merupakan alamat anycast.

alamat multicast adalah alamat yang menunjukkan beberapa interface (biasanya untuk node yang
berbeda). Paket yang dikirimkan ke alamat ini maka akan dikirimkan ke semua interface yang
ditunjukkan oleh alamat ini. alamat multicast ini didesain untuk menggantikan alamat broadcast
pada IPv4 yang banyak mengkonsumsi bandwidth.

Tabel alokasi alamat IPv6
__________________________________________________________________
|alokasi | binary prefix |contoh (16 bit pertama |
|_______________|__________________________|_______________________|
|Global unicast |001 | 2XXX ato 3XXX |
|link local |1111 1110 10 | FE8X - FEBx |
|site local |1111 1110 11 | FECx - FEFx |
|Multicast |1111 1111 | FFxx |
|_______________|__________________________|_______________________|

selain alamat diatas tadi ada juga jenis pengalamatan lainnya diantaranya:

#IPv4-compatible IPv6 address biasanya alamat ini digunakan untuk mekanisme transisi Tunelling
format alamatnya kaya gini:

80 bits |16 | 32 bits |
+-------------------+------+---------------------+
|0000...........0000| 0000 | IPv4 address |
+-------------------+------+---------------------+

contohnya:
= 0:0:0:0:0:0:192.168.30.1
= ::192.168.30.1
= ::C0A8:1E01
jadi 0:0:0:0:0:0:192.168.30.1=::c0AB:1E01 kok bisa dapat dari mane? gini caranya:
buat dulu alamat 0:0:0:0:0:0:192.168.30.1 jadi biner
::11000000.10101000.00011110.00000001 kemudian kelompokkan menjadi masing 16 bit
::[1100.0000.1010.1000]:[0001.1110.0000.0001] diubah ke heksa desimal--->::C0A8:1E01
tanda "." (titik) didalam kurung untuk mempermudah konversi dari biner ke heksadesimal.
sudah pahamkan? masih belum juga silahkan ulangi lagi dengan perlahan:p

#IPv4-mapped IPv6 address biasanya digunakan untuk mekanisme transisi ISATAP.

80 bits |16 | 32 bits |
+-------------------+------+---------------------+
|0000...........0000| FFFF | IPv4 address |
+-------------------+------+---------------------+

contohnya: =::FFFF:192.168.1.2

#IPv6 over ethernet digunakan untuk stateless autoconfiguration (pemberian alamat IPv6
secara otomatis tanpa memerlukan server yang memberi alokasi IP address, mirip DHCP
cuman tanpa server).
contoh:
00:90:27:17:FC:0F
/\
/ \
FF FE
maka alamatnya menjadi 00:90:27:FF:FE:17:FC:0F kemudian diblok pertama bit ketujuh diinvers
00:90:27:17:FC:0F
|
|
\|/
000000[0]0 bit yang dikurungi diinvers dari 0--->1
maka sekarang menjadi 02:90:27:FF:FE:17:FC:0F alamat tersebut adalah alamat IPv6 over ethernet.

oke mungkin segitu dulu tulisan dari saya, sebagai dasar teori untuk IPv6 (ceile!!!!),
sebenarnya masih banyak yang ingin saya tulis cuman nanti terlalu panjang nih artikel takut
ga ada yang baca. (heu.....heu...)

semoga tetap dalam semangat untuk berbagi!!!!!
Wassalam


kritik&saran silahkan kirim ke pan6eran_biru[at]yahoo.com


Referensi:-TCP/IP standard,desain dan Implementasi, Onno W.purbo dkk
-Teori dan Implementasi IPv6 Protokol Internet Masa depan, Riza Taufan
-Interkoneksi IPv6 dengan menggunakan DSTM, Dody Setiawan
-Implementasi dan Analisa Teredo untuk interkoneksi jaringan IPv6/IPv4 dengan jaringan
IPv6 yang melalui IPv4 NAT (Network Address Translation), Wahidi Somad
-Introduction & Deployment IPv6 Tutorial,Che Rohani Ishak dkk


[###############################################################################################]

thengkiyu tu :-aLL echo|staff,

GreetZ to :-temen-temen seperjuangan: |blo`on|,gorila,dragon CCNA, mbah harjo,ksj,
st3alth (adeku yang baik!), all dech!!!
-barudak #sunda (belegug [salam blemoh!!!],Hendi, al-mubarak,all dech!)
-special Kanggo: Neng Wiharyanti Purnama Dewi(kapan maen ke kost lagi?)
-buat orang-orang yang pernah mencaci gw, mentertawakan gw,
kalian adalah pemacu semangatku heu....heu...

[###############################################################################################]

Kamis, 23 Oktober 2008

Linux Advanced Routing Mini HOWTO

This page is a small HOWTO about the advanced linux routing...


First of all let me tell you where you can find the best source of information about the advanced routing under Linux. Most of you probably know or heard about the Linux Advanced Routing & Traffic Control site. There you can see a very comprehensive source of knowledge based not only on documentation but by easy to understand examples...

Credits: Linux Advanced Routing & Traffic Control, Thea

Ok, then...
This page will show you how to set a linux box to use 2 different ISPs on the same time...

First example:
Goal: To route packets that came from 4 network to different ISPs

Let's presume that you have two ISPs. In the following examples I'll use RDS and ASTRAL (two large ISPs from my country)
For the ASCII art and lynx console browser fans I'll use this kind of chart:
                                                                   ________
+-------------+ /
| ISP 1 | /
+-------------+ (RDS) +------+
| | gw 10.1.1.1 | /
+------+-------+ +-------------+ /
+----------------+ | eth1 | /
| | | | |
| Local networks +----+ Linux router | | Internet cloud
| | | | |
+----------------+ | eth2 | \
+------+-------+ +-------------+ \
| | ISP 2 | \
+-------------+ (ASTRAL) +------+
| gw 10.8.8.1 | \
+-------------+ \________
We will work only on Linux router box. From the root prompter do:
echo 1 RDS >> /etc/iproute2/rt_tables
echo 2 ASTRAL >> /etc/iproute2/rt_tables
The /etc/iproute2/rt_table content after previous commands:
#
# reserved values
#
255 local
254 main
253 default
0 unspec
#
# local
#
#1 inr.ruhep
1 RDS
2 ASTRAL
Now we have three routing tables as follows: RDS table, ASTRAL table and the main table...
Let's fill up every table with the defaults routes:

The next step is to have some routing rules and routes:

For the RDS table:
ip route add default via 10.1.1.1 dev eth1 table RDS
ip rule add from 10.11.11.0/24 table RDS
ip rule add from 10.12.12.0/24 table RDS
For the ASTRAL table:
ip route add default via 10.8.8.1 dev eth2 table ASTRAL
ip rule add from 10.22.22.0/24 table ASTRAL
ip rule add from 10.33.33.0/24 table ASTRAL
To see the routing tables:
ip route show table ASTRAL
ip route show table RDS
ip route show table main # it's the same as "route -n" but in different format...
To see the routing tables:
ip rule show   # all the rule list
ip rule show | grep ASTRAL # only for ASRAL
ip rule show | grep RDS # only for RDS
Let me explain the above rules.
The packets that came from the 10.11.11.0/24 and 10.12.12.0/24 networks will go to the RDS routing table and then (because we have a default route) will be passed to the RDS gateway. And similar, the packets that came from the 10.22.22.0/24 and 10.33.33.0/24 network will go to the ASTRAL gateway...
What is happening with the packets that came from other networks that are not shown in the above rules? Well, they just simply go to main routing table and follow the routing rules that reside there... If you want to block them to go to internet just delete the default route from the main table... (of course, doing that your router can not longer go to interent).


Second example:
Goal: To route the packets having the destination port 22/tcp to the RDS and 80/tcp to the ASTRAL (no matter what network generates them).
This example it is almost the same as the first one except that we will use iptables to mark the packets.

Same chart...
                                                                   ________
+-------------+ /
| ISP 1 | /
+-------------+ (RDS) +------+
| | gw 10.1.1.1 | /
+------+-------+ +-------------+ /
+----------------+ | eth1 | /
| | | | |
| Local networks +----+ Linux router | | Internet cloud
| | | | |
+----------------+ | eth2 | \
+------+-------+ +-------------+ \
| | ISP 2 | \
+-------------+ (ASTRAL) +------+
| gw 10.8.8.1 | \
+-------------+ \________

Same /etc/iproute2/rt_table content:
#
# reserved values
#
255 local
254 main
253 default
0 unspec
#
# local
#
#1 inr.ruhep
1 RDS
2 ASTRAL
Before you start check your iptables configuration. I strongly recommend to read about iptables if you are unsure about what you will doing next.
For more documentation go to iptables home page or you can download a good documentation from this site (Security & Privacy Section) or directly from here.

To mark the packets that have the 22 and 80 as destination port we will use the MANGLE table...
iptables -A PREROUTING -t mangle -i eth0 -p tcp --dport 22 -j MARK --set-mark 1
iptables -A PREROUTING -t mangle -i eth0 -p tcp --dprot 80 -j MARK --set-mark 2
For the RDS table:
ip route add default via 10.1.1.1 dev eth1 table RDS # the same like in the first example
For the ASTRAL table:
ip route add default via 10.8.8.1 dev eth2 table ASTRAL # the same like in the first example
The next step is to have some routing rules based by the marked packets:

For the RDS:
ip rule add from all fwmark 1 table RDS
For the ASTRAL:
ip rule add from all fwmark 2 table ASTRAL
You can use the same commands to see the routing tables and rule lists as in the first example.
Now you have a routing solution based by the destination port...

If you need additional infos or Q&A please go to Contact Page for our e-mail addresses...

http://www.linuxhorizon.ro/iproute2.html

Rabu, 22 Oktober 2008

Mikrotik policy routing implementation example

Thanks to

Butch Evans
http://blog.butchevans.com

Mikrotik policy routing implementation example

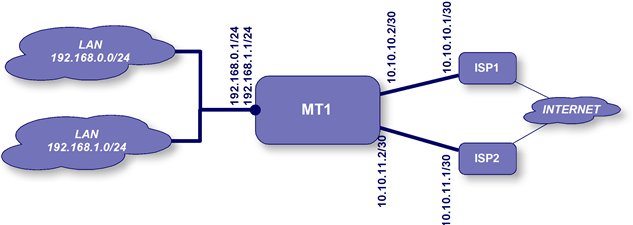
In “normal” routing, you have a set of routes that tell the router about how to reach certain networks. Policy routing is a way to do the same thing, but have different “paths” or routes for various types of traffic. In this article, we will explore the requirements for setting up policy routing and explain some of the concepts involved.

Policy routing is implemented in 3 parts. The first part is to define the routes and which policies will use those routes. The second part is the routing rules, which will define how the policies apply to certain traffic. The third is to define the actual policies. We’ll look at each of these individually.

The network below is the one we will use for this example.

We will assume that you already have the IP addresses set up on your router.

Read more:

http://blog.butchevans.com/2008/09/mikrotik-policy-routing-implementation-example/

Kamis, 09 Oktober 2008

Optimasi Apache2

Optimize Apache 2.0 (Apache2) on RHEL - Track users using Clickstream

First, make a backup and then modify /etc/httpd.conf and change settings as follows


# change Timeout 300 to
Timeout 45
# change KeepAlive Off to
KeepAlive On
# MaxKeepAliveRequests: The maximum number of requests to allow
# during a persistent connection. Set to 0 to allow an unlimited amount.
# We recommend you leave this number high, for maximum performance.
# -- change MaxKeepAliveRequests 100 to 500
MaxKeepAliveRequests 500
# KeepAliveTimeout: Number of seconds to wait for the next request from the
# same client on the same connection.
# change KeepAliveTimeout 15 to
KeepAliveTimeout 5
# Increase MaxClients after benchmarking. mine is
MaxClients 200
# Turn off ServerSignature
ServerSignature Off

#ServerTokens Product
ServerTokens ProductOnly

http://frankmash.blogspot.com/2005/11/optimize-apache-20-apache2-on-rhel.html